
This post will deal with two things I experimented on the tadpole: blank extension and spigot ferrule creation.

So, you’ve heard everywhere about fiberglass, which is the next craze in our little fly world. Maybe you’re just a tackle freak, and you want to check it out because you’ve got to. Maybe you’re tired of putting a 7wt TT on your fast 5wt to ba able to use it (but you like fast, of course, who wants to like slow?) and you wonder if the ‘true glass feel’ will not give you a good story to tell to go back to something that matches your actual casting stroke. Maybe you just want to get a really short fly rod. Or you can’t afford much more, and you suspect you could get a nice rod for very little money.
Any of these reasons is valid, but the best ones to go the tadpole route are the need for a short rod that will tke some abuse, and the lack of funds. At 5′ and 13€ apiece, provided you’re not too fancy about the rest of the components, your ticket for the short glass world will not break the bank. Obviously, there’s very good opportunities on the second-hand market, but building your own rod is something else, and as the glass bug spreads prices tend to get a little out of hand.

Classic glass. Will cost you an eye.
So. You’ve got a handful of coins and want to have fun with the ten inches chubs in the stream back there, without fearing to have a go at those fat three pounders you see sometimes. Let’s say you’d prefer it not too short (closer to 6′) and in two pieces for transport.
Come here, I’ll show you how you do that.
First get two Batson SPG 601 blanks. You’ll need the second as an organ donor. A couple of inexpensive burl cork rings (10 is good), a simple aluminium reel seat, six fly guides (five #1, a #2), a garden variety size 12 insert guide for the stripper, a 4.5 tip and you’re set. If you insist you can add a winding check and a hook keeper. I did not.

Stickers you probably won’t use on a tadpole
Now, follow those steps:
- Sand gently blank #1 to remove the paint.
- Find and mark the spine on blank #2. Measure its inner diameter (ID) at the butt.
- Find the point on blank #1 with a matching outer diameter (OD). Mark the blank 3″ (7.5cm) above this point (ie towards the tip). Cut there, using a metal saw or a dremel, or maybe more refined techniques if you feel fancy. It’s better to put masking tape where you will cut, to avoid splints. Sand smooth the cut’s edges. The butt part of blank #1 is your extension.
- Test fit the extension into blank #2’s butt. The whole extended blank should measure approximately 5’10 (178cm). Mark on the extension where it goes out of blank #2. You will build the handle on the extension, and you don’t want it to go past the point where it enters into blank #2.
- Tape the ferrule (ie blank #2’s last inch) and put the whole extended blank under load. Observe the curve, and ask yourself where you want to put the spigot. It will create a hard spot, so you want to get it as low on the butt as you can, without sacrificing too much of the rod’s portability. I found that a 33″ butt, including the spigot, is a reasonable balance.
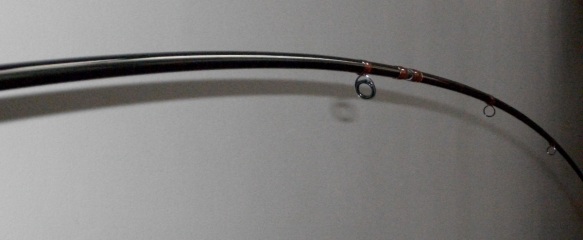
Slight but noticeable hard spot
- Measure 40″ (101,6cm) from the tip on blank #2. Tape the blank, cut and smooth the edge on both parts.
- Measure the ID of blank #2’s tip. Find the point on blank #1 with a matching OD. Mark the blank 3″ (7.5cm) above this point. Cut there, and sand the edge. The part below the cut will be the spigot.
- Test fit the spigot into the tip of blank #2. Mark the point where the spigot goes out of the tip (call it A). Mark a point one inch below this point (call it B). This is where the spigot should go out of the blank’s butt. Mark a point 3″ below this point. Cut there, sand the edge. The piece of blank is your spigot. The one inch between A and B will show, and preserve a tight fit as the spigot wears down along the years.

Mister spigot doing its job
- We now strengthen the spigot by double walling it. Insert the remaining tip of blank #1 into the spigot, and trim the excess. Epoxy the slim spigot into the larger one. Let cure for a couple of hours. You can even triple wall it if you’re into that sort of things.
- We need to shape the spigot so that it will sit exactly where it should into blank #2’s butt. Insert the spigot in the butt, and check where it comes out. Typically, the B point (from step 8) is not visible. Very slowly and carefully, sand all around the spigot’s lower part. Check often to see whether the B point is now visible. When B appears, stop sanding and epoxy the spigot into blank #2’s butt. Let cure.

You can see there the marks on the spigot: emerging points from butt and from tip
- Meanwhile, you can epoxy your grip onto the extension. You may want to stop the grip right where the extension enters the blank. Or — as I did — you may want to let this point visible, to get a kind of ferruled look which I like a lot. This is pure cosmetics, it’s up to your tastes.

- Once the grip is cured, epoxy the extension into blank #2’s butt. Make sure the reel seat is where you want it to be with respect to the butt’s spine. Let cure.
- You’re ready to wrap that thing and finish it.


Next time, the vented grip, guides specification and Common Cents.


